Showing posts with label Windows Tips. Show all posts

Friday, December 12, 2008

How to format a pc with Windows XP

0 comments


1.Put the CD i mean (your operating system installation CD) (Windows XP or 2000) into your CD-Rom drive.
2.Restart your computer.
3.press F2 ( for get to the boot priority screen.)
4.Use the arrow keys to move to the “Boot” tab.
5.Set first boot device to the CD-Rom drive with the Windows XP or 2000 CD
6.Save
7.Press F10 for Exit
8.Press any key to boot from the CD (quickly). Wait for a while (for loading.....)
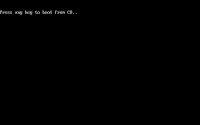
9.Your computer should automatically boot from the CD.
10.Press ENTER to setup Windows.( Main Menu )
11.Press F8 to accept the Windows XP Licensing Agreement.Continue installing…
12.Use the ARROW keys to select the partition ( partition or unpartitioned space )
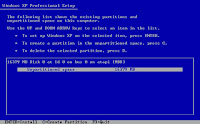
13.Press “D” to delete the main partition or an existing partition ( Where you want to create a new partition. )
14.Or press C to create a new partition.( Type the size (MB-megabytes)
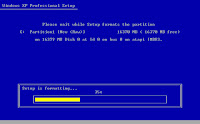
15.Then press ENTER. ( Yes to set up Windows XP on new partition )
Wait while it formats the hard drive.( May be takes about 30 min. depend in CD and PC ).
Windows installation process should start automatically.........
Read full story

Saturday, December 6, 2008

Create a Shortcut to Lock Your Computer

0 comments

Leaving your computer in a hurry but you don't want to log off? You can double-click a shortcut on your desktop to quickly lock the keyboard and display without using CTRL+ALT+DEL or a screensaver.

To create a shortcut on your desktop to lock your computer:
1.Right-click the desktop.
2.Point to New, and then click Shortcut.
3.The Create Shortcut Wizard opens. In the text box, type the following:
rundll32.exe user32.dll,LockWorkStation
4.Click Next.
5.Enter a name for the shortcut. You can call it "Lock Workstation" or choose any name you like.
6.Click Finish.
Read full story

Thursday, December 4, 2008

How do I delete an "undeletable" file

0 comments
1.Open a Command Prompt window and leave it open.

2.Close all open programs.

3.You now need to close EXPLORER.EXE. The proper way to shutdown Explorer is to raise the "Shut Down Windows" dialog (select "Shut Down..." from the start menu), hold down CTRL+SHIFT+ALT and press the CANCEL button. Explorer will exit cleanly.
Note: The at the 'Shut Down Windows' dialog method of closing Explorer is built into Explorer. (It was specifically designed so that developers writing Shell Extensions could get Explorer to release their Shell Extension DLLs while debugging them).

4.Go back to the Command Prompt window and change to the directory where the undeletable file is located in. At the command prompt type DEL where is the file you wish to delete.

5.Go back to Task Manager, click File, New Task and enter EXPLORER.EXE to restart the GUI shell.

6.Close Task Manager.


Windows 95/98/ME

If you are using Windows 95, 98, or Windows ME, the easiest way to remove an undeleteable file is to boot to a DOS prompt and manually delete the file. Before you do this, you'll want to make a note of the location of the file including the entire path to it. Follow the steps below to delete these types of files.
If you already know the path to the file, please skip to Step 7

1. Click on Start, Find, Files and Folders
2. Type the name of the undeletable file in the Named or Search For box
3. Make sure the Look In box shows the correct drive letter
4. Click on Find Now or Search Now and let the computer find the file
5. Once the file is located, right-click on it and choose properties, make a note of the file location. Usually this is something similar to

c:\windows\system32\undeleteablefilesname.exe
6. Close the search box
7. Locate a boot disk for your version of Windows, if you do not have a boot disk, follow the steps on the link below to create an emergency boot disk.

How to Create an Emergency Boot Disk for Windows

8. Shut down and restart your computer with the boot disk in your floppy drive.
9. The computer will boot to a DOS prompt that will look similar to

c:\

10. Type the following command and press Enter to delete the filer, substituting the phrase with the actual path and file name you discovered in Step 5 above.

del

Example:

del c:\windows\undeleteablefile.exe
11. Remove the boot disk in the floppy drive and restart your computer
12. The file should now be deleted.

Windows XP

In Windows XP, there are a couple ways to remove an undeleteable file, a manual way, and a couple automated ways using some freeware programs. First, I'll show you the manual way.

Manual Method

If you already know the path to the file, please skip to Step 7

1. Click on Start, Search, All Files and Folders
2. Type the name of the undeletable file in the box shown
3. Make sure the Look In box shows the correct drive letter
4. Click Search and let the computer find the file
5. Once the file is located, right-click on it and choose properties, make a note of the file location. Usually this is something similar to

c:\windows\system32\undeleteablefilesname.exe

6. Close the search box
7. Click on Start, Run, and type CMD and Press Enter to open a Command Prompt window
8. Leave the Command Prompt window open, but proceed to close all other open programs
9. Click on Start, Run and type TASKMGR.EXE and press Enter to start Task Manager
10. Click on the Processes tab, click on the process named Explorer.exe and click on End Process.
11. Minimize Task Manager but leave it open
12. Go back to the Command Prompt window and change to the directory where the file is located. To do this, use the CD command. You can follow the example below.

Example: to change to the Windows\System32 directory you would enter the following command and Press Enter

cd \windows\system32

13. Now use the DEL command to delete the offending file. Type DEL where is the file you wish to delete.

Example: del undeletable.exe
14. Use ALT-TAB to go back to Task Manager
15. In Task Manager, click File, New Task and enter EXPLORER.EXE to restart the Windows shell.
16. Close Task Manager
Read full story

Wednesday, December 3, 2008

Hiding shared folders with $

0 comments
If you would like to share a folder so that users on your network can access it easily, but are worried about displaying the folder for anyone to browse through, there is an easy way to render a shared folder invisible but still accessible.

From the shared folder dialog: (right click on desired folder\sharing and security\). You can hide a shared folder by simply adding a '$' to the end of the name you give the folder in the 'sharing and security' window. In this way, you can maintain network access to shared folders, while hiding them from prying eyes.

To browse to a hidden shared folder from another computer, simply click 'start/run' then type \\(name of the computer the share is on)\(sharename$) and press enter.
Read full story

Tuesday, January 8, 2008

How to Make Windows Start Up Faster

0 comments
I don't know about you, but I love spending the first 10 minutes of every workday watching Windows start up. It's like a Zen thing. If you'd rather get right to work, though, the following tips should help you make Windows start much more quickly.

Lighten the Load

A typical PC loads a lot of programs every time it starts. Each of the icons in your system tray (the area near your clock) represents an auto-start application. And there are probably other programs on your machine that start automatically but don't make their presence known so easily. Each autoloading app slows your boot time--a little or a lot. And because most of them continue to run in the background, they rob you of a little performance.

Before you start eliminating autoloaders, though, make sure you can undo your changes. In Windows XP, Select Start, All Programs, Accessories, System Tools, System Restore. Select Create a restore point, click Next, call your restore point something like before removing autoloaders, and choose Create. Click Close once you've created the restore point.

In Windows Vista, select Start, Control Panel, System. Under 'Tasks' on the right side of the window, click System Protection. In the System Properties box that comes up, click Create at the bottom of the window.

XP users should now select Start, Run, type msconfig, and press . (In Vista, select Start, type msconfig.) Click the Startup tab, and you'll see a list of all your autoloading programs, each with a check box. Uncheck an item, and it will no longer load at startup. into the Search box, and press

Choose Your Autoloading Apps

Which applications should you leave checked so that they continue to autoload? First and foremost, you don't want to operate without your antivirus, firewall, and other security programs. Yes, these programs slow your PC's boot-up and shutdown, and they can even cause conflicts, but the cost of not having them running is too high to bear.

For any other program in the list, use your judgment. Don't ask yourself "Is it a good program?" but "Does it need to be on all the time?" For instance, I unchecked Adobe Elements' Photo Downloader, a program that I use whenever I download photos from my camera, because it serves no purpose when I'm not downloading photos. On the other hand, I allow Copernic Desktop Search to autoload because it needs to index my data files continually.

After unchecking the programs that you don't need to autoload at startup, click OK and reboot. Windows will load with a very wordy message box that might look like an error message. Just check Don't show this message or launch the System Configuration Utility when Windows starts (the wording is slightly different in Vista) at the bottom of the dialog box and click OK.

Windows Dusting and Cleaning

If an autoloader diet doesn't sufficiently accelerate your boot-up, try these tweaks:

Clean out the Registry. The larger your Windows Registry, the longer the OS will take to boot. My favorite Registry cleaner is ChemTable's $30 Reg Organizer, which is both a powerful Registry editor and a general Windows maintenance tool. If you don't want to pay to put things in order, try the less-powerful EasyCleaner from ToniArts.

Use fewer fonts. Loading hundreds of system fonts takes time. If you have more than 500 fonts on your PC, remove a few. Sue Fisher's free The Font Thing utility will help you whittle your font selection down to size.

Add RAM. Faster hardware means faster boots (and shutdowns, and everything in between). There's no cheaper, more effective way to improve your hardware's performance than by adding RAM. See our video tip, "How to Upgrade Your RAM" for step-by-step instructions.

Thanks Kaja

Read full story
 

My Blog List

Hello