Sunday, November 30, 2008

Replace your Notepad with Advanced NoteTab Text Editor

2 comments
Notepad is a Simple Text Editor that comes along with your Windows Vista or XP OS but what lacks in Notepad is lack of features. Note Tab Light is a Free ware Text Editor with features like Tab Windows where users can Switch between Multiple Tabs. Users can Open Multiple Text Documents and Switch across them with ease.

Note Tab Software is available in Three Different Versions ranging from a Free Light Version, Pro to a Standard Version. The latest Note Tab Version 5.3 is Compatible with Windows Vista Version.

Note Tab allows users to Open an Unlimited number of Tabs on its Interface.Each file runs in its own Tab and switch between the Windows is pretty easy. Note Tab is some Interesting Features where Users can Extract HTML code out of a Document, Paste Board that can be used to save Text Clips Automatically . Users can choose a Document as a Paste Board. Any content that is added to the Clip board will be Automatically appended with the Content in the Paste Board.

Note Tab also has a clip Library where users can access small Drag and Drop scripts starting from a Text, Audio Clips, HTML Tabs and other Scripting Language Codes. The Advanced Version of the Note Tab has features like replacing Content in a File without Opening the File.
Read full story

Saturday, November 29, 2008

How to Save a Laptop from Liquid Damage

0 comments

1. Shut it off! Immediately remove the battery, the A/C adapter, and unplug the device after the spill. The biggest danger at first is the device shorting out.


2. Turn it upside down immediately to stop the liquid from traveling deeper into the machine.

3. Clean up any part of the spill you can get to. Use paper towels or any absorbent material that is lint-free.

4. Inspect the keyboard. Some keyboards are designed to protect the internals from liquids:
* Pour out any liquid contained in a keyboard enclosure.
* Remove and clean an easily removable keyboard.

5. Wipe up anything sticky. This may include the screen, the keys on the keyboard, and any buttons. Use a clean, slightly dampened, lint-free cloth.

6. Disconnect and remove any and all external devices.

7. Insulate yourself from static discharge. Static electricity can be very high voltage. Static discharge from your hands and body can destroy even a dry computer. Learn how to Avoid Destroying a Computer With Electrostatic Discharge.

8.Disassemble the case. If you cannot get to the whole spill, then it may be necessary to remove the laptop's case. Most spills will contain chemicals that can corrode internal circuit boards:
* If you aren't comfortable taking your device apart, then get it to someone who is, as soon as possible.
* Pull the hard drive to protect your data.
* Remove as many cards or drives as you can.

9. Remove dry residue. Use a toothbrush or lint-free cloth to gently remove any dried residue from non-water stains such as cola or coffee. Blow the residue away with compressed air.

10. Rinse off the residue. If you spilled anything besides water on the laptop, rinsing it clean will be the most dramatic part. There are several ways to rinse your machine, depending on the kind of spill, and how much risk you are willing to endure:
* Think about what has been spilled on/in your computer, and determine whether it is water soluble or petro-chemical based. In the case of the former, deionized water will work fine. If it is oily, etc., then rinse with denatured alcohol, and then rinse with deionized water.
* Rinse with water. Take any components that have residue (a fresh spill or an old spill of cola) and rinse them under the tap. Most circuit boards and similar non-moving components handle water well, as long as they are not powered. Some internal components with moving parts may not handle water well, for example, fans and CD/DVD drives.
* Rinse with deionized or distilled water. Many people prefer to rinse with deionized water over tap water. Regular water will leave deposits that can cause electrical shorts, but deionized water will rinse clean, dry, and leave nothing behind.
* Don't get too carried away rinsing your machine. Water and laptops do not mix, either. Rinse as much as you need to, and not more. Carefully blot up excess water, if any.

11.Let it dry. Be completely sure that the parts are dry before you proceed. As with rinsing, there are different theories on drying:
* Dry naturally. Prop the machine up, away from surfaces, so that air can circulate in and around the entire unit. Leave the machine to dry for 24 to 48 hours.
* Dry with light heat. Place your deck on a warm radiator or on top of a warm sill or shelf - out of direct sunlight - or near other source of warmth. Do not use high levels of heat, just moderately warm sources of heat. Let it dry for 12 hours, or so. A nearby dehumidifier may improve drying time.
* Never use a hair dryer, as this will cause static problems and fill your machine with more contaminants and dust. A hair dryer at a high setting could also melt some of the plastic components.

12. Clean with a solvent. A second rinse with a solvent-based cleaner is recommended by some, and abhorred by others.
* If you suspect that your first rinse did not remove all of the residue, a chemical rinse of this kind may be worth the risk. The advantages of such a rinse are: there is only one substance to apply and remove; that substance, typically, evaporates; long drying times are not required. The disadvantage is that, if you use the wrong solvents, you can literally dissolve your computer.
* Buy and use 99% (not 90%) isopropyl alcohol. Never, ever use gasoline or acetone to clean computer parts.
* Using a cotton swab, carefully rub or wipe each component of the board, until it is clean.
* Try flux remover, a spray-on can available in electronics stores, rather than isopropyl alcohol.

13.Put the laptop back together, and test it to see if it is working.
Read full story

Friday, November 28, 2008

TOP 20 PC Tips

0 comments

Control Panel on the DESKTOP.

On The Desktop, Right Click Your Mouse Then Choose "New | Folder". Name The Folder As "ControlPanel. {21EC2020-3AEA-1069-A2DD-08002B30309D}" Without The "Quote Things. And Now You Can Access The Control Panel More Faster Then Before.

Changing INTERNET EXPLORER icon Name.

Open Registry Editor Then Go To : "HKEY_CURRENT_USER\Software\Microsoft\Windows\CurrentVersion\Explorer\CLSID". You Can See A Few Key Below It.


Deleting the INDEX.DAT
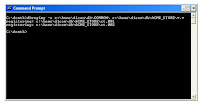
Del "C:\Documents and Settings\aeon\Local Settings\Temporary Internet Files\Content.IE5\index.dat"


Removing user name in the start menu
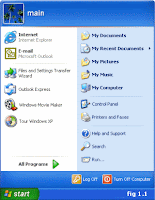
Open Registry Editor Then Go To : "HKEY_CURRENT_USER\Software\Microsoft\Windows\CurrentVersion\Policies\Explorer".

On The Right, Make A New Entry With Right Click On Your Mouse Then Choose "New | DWORD Value" Change The Entry's Name Into "NoUserNameInStartMenu", Double Click In The New Entry And Fill The "Value Data" With "1". Press OK, Exit From The Registry Editor. Restart Your Computer.


Internet explorer speed up.

Edit your link to start Internet Explorer to have -nohome after it. For Example: "C:\Program Files\Internet Explorer\IEXPLORE.EXE" -nohome

This will load internet explorer very fast because it does not load a webpage while it is loading. If you want to go to your homepage after it is loaded, just click on the home button.


Speed up web browsing.

Iv'e personally found a dramatic increase in web browsing after clearing the Windows XP DNS cache. To clear it type the following in a command prompt: ipconfig /flushdns.


Easy way to add the ADMINISTRATOR USER to the welcome screen.

Start the Registry Editor Go to:

HKEY_LOCAL_MACHINE \ SOFTWARE \ Microsoft \ Windows NT \ CurrentVersion \ Winlogon \ SpecialAccounts \ UserList \

Right-click an empty space in the right pane and select New > DWORD Value Name the new value Administrator. Double-click this new value, and enter 1 as it's Value data. Close the registry editor and restart.


Drive icon.

To set the icon of any drive (hard disk, cd rom or anything else) with a letter (C:\ etc.), run REGEDIT (Start -> Run -> regedit)
Navigate to:

HKEY_LOCAL_MACHINE\SOFTWARE\Microsoft\Windows\CurrentVersion\Explorer

If one doesn't already exist, create a new KEY called "DriveIcons". Under this key, create a new key with the letter of your drive. I.e. C for your C:\ drive.
To change the icon for that drive, create a key inside that one called DefaultIcon and set the path of (Default) to the location of your icon
eg C\DefaultIcon\ then (Default) = D:\Documents\C Drive Icon.ico

To change the name of that drive, create a key in the drive letter one (eg C\) called DefaultLabel and set the (Default) to what you want the drive to be called. This is useful if you want to assign a long name to the floppy drive.


Locking computers.

To lock a computer in XP, as you probably know, you press "L" while holding down "Windows Logo" key on your keyboard. However, if you would like to lock a computer remotely, for example via "Remote Administrator", you don't have this ability. What you can do instead, is to create a shortcut on remote computer's desktop where Target %windir%\System32\rundll32.exe user32.dll,LockWorkStation Start In %windir%


Administrator in welcome .

When you install Windows XP an Administrator Account is created (you are asked to supply an administrator password), but the "Welcome Screen" does not give you the option to log on as Administrator unless you boot up in Safe Mode.

First you must ensure that the Administrator Account is enabled:

1 open Control Panel
2 open Administrative Tools
3 open Local Security Policy
4 expand Local Policies
5 click on Security Options
6 ensure that Accounts: Administrator account status is enabled Then follow the instructions from the "Win2000 Logon Screen Tweak" ie.

1 open Control Panel
2 open User Accounts
3 click Change the way users log on or log off
4 untick Use the Welcome Screen
5 click Apply Options

You will now be able to log on to Windows XP as Administrator in Normal Mode.


Hidden windows XP icon.

Windows XP Pro and Home contains icons for folders and files that cannot normally be seen, you can select to view hidden files from the folder options menu, but there are still some that remain hidden.

You can set windows to view these files as normal hidden files, so that when you use the view hidden files and folders toggle from the folder options menu that these will be turned on/off along with the normal hidden files.

These files are usually system files and should not be altered/deleted unless you really know what you are doing, if you don't yet still wish to change them I might suggest that you create back-ups of your system first.

I will personally accept no responsibility for any damage caused by using this tweak. To view the hidden files you need to open up regedit, if you are not sure how to do this, select run from the start menu and type in 'regedit' without the apostrophe's. In the regedit window, expand out the groups by clicking on the '+' next to the name in the left hand column of regedit, and navigate to the below address.

HKEY_CURRENT_USER \SOFTWARE \MICROSOFT \WINDOWS \CURRENTVERSION \EXPLORER \ADVANCED

when you have clicked the advanced folder on the left pane, look down the list at the titles in the right hand pane, one of those titles is 'ShowSuperHidden'

double click the title and in the window that appears set the value to equal 1 to show the super hidden files and 0 to hide them.


Auto delete tempopary folder.

First go into gpedit.msc

Next select -> Computer Configuration/Administrative Templates/Windows Components/Terminal Services/Temporary Folder

Then right click "Do Not Delete Temp Folder Upon Exit"

Go to properties and hit disable. Now next time Windows puts a temp file in that folder it will automatically delete it when its done! Note from Forum Admin: Remember, GPEDIT (Group Policy Editor) is only available in XP Pro.


Clear unwanted entries from add/remove programs.

Run the Registry Editor (REGEDIT).

Open HKEY_LOCAL_MACHINE\ SOFTWARE\ Microsoft\ Windows\ CurrentVersion\ Uninstall Remove any unwanted keys under "Uninstall."


CD ROM stops AUTOPLAYING/AUTORUN.

And the AutoPlay Tab has disappeared in My Computer, Devices With Removable Storage, Right Click on CDROM, Properties.

Solution: The service: "Shell Hardware Detection" has been set to Manual or Disabled. Go to Control Panel, Administrative Tools, Services. Return this service to "Automatic".


Shutdown XP faster
Method1
Like previous versions of windows, it takes long time to restart or shutdown windows xp when the "Exit Windows" sound is enabled. to solve this problem you

must disable this useless sound. click start button then go to settings -> control panel -> Sound,Speech and Audio devices -> Sounds and Audio Devices -> Sounds, then under program events and windows menu click on "Exit Windows" sub-menu and highlight it.now from sounds you can select,choose "none" and then click apply and ok. now you can see some improvements when shutting down your system.

Shutdown XP faster.
Method2
Start Regedit.
Navigate to HKEY_LOCAL_MACHINE/SYSTEM/CurrentControlSet/Control.
Click on the "Control" Folder.
Select "WaitToKillServiceTimeout"
Right click on it and select Modify.
Set it a value lower than 2000 (Mine is set to 200).


16 Colours icons.

If you select 16bit mode for graphics your icons will revert to using 8bit (16 color) icons. Yuck! Change the following registry setting to:

[HKEY_CURRENT_USER\Control Panel\Desktop\WindowMetrics] "Shell Icon BPP"="16" "Shell Icon Size"="32" Setting the BPP to 16bit will yield 65565 colors for icons.
Read full story

Thursday, November 27, 2008

How to Hide specific Drives ?

0 comments
This tutorial illustrates how to hide and show your computer drives from Windows XP. You can hide or show as you want both drives in your computer and drives in the computer network. This way can be safe for data in your computer and prevent others from accessing to your drives that may contain important information. This example I will hide drive D and you can apply this method to another drive you want, just change a value that I will explain “how to” in detail. Let you hide drives now.

* Access to the Registry Editor program, running regedit.
* Find the path like below,

HKEY_CURRENT_USER\Software\Microsoft\Windows\CurrentVersion\Policies\
Explorer

* Right click on the Explorer folder and select New > DWORD Value.
* Name the registry NoDrives.

# Double click on NoDrives which is in the right page.
# In the DWORD Value window, select Decimal.
* In this case I want to hide drive D, so I must fill 8 in Value data. The number you filled varies with drive you want it to be hidden. If you want to hide the other drives, you must put the drive-related number like below,

A=1, B=2, C=4, D=8, E=16, F=32, G=64, H=128, I=256, J=512, K=1024, L=2048, M=4096, N=8192, O=16384, P=32768, Q=65536, R=131072, S=262144, T=524288, U=1048576, V=2097152, W=4194304, X=8388608, Y=16777216, Z=33554432, All drive=67108863

For example, I can hide drive J only if I put the number 512 under selecting Decimal. What to do in case I prefer to hide more than one drive ? That is easy just plus the numbers. To illustrate, I want to hide drive C and E so I put the result number of 4 plus 16 that is 20.

* Click OK button and close the Registry Editor program.
* Log off and Log on your computer. Finish !
Read full story

Firefox tips

0 comments
Tip: Double Clicking empty space on the Tab Bar will open a ‘New Tab’
Tip: Middleclick/MouseWheelClick on a Bookmark on your Personal Toolbar will open it up in a New Tab
Tip: MiddleClick/MouseWheel Click on a folder will open all the bookmarks in the folder in a new Tab(s)
Tip: holding down the Shift or Ctrl key when you RightClick to “View Image” or “View Backround Image”will open the image in a New Tab or New Window.
Tip: Unused menus or menu Items can be hidden by using the customizing your userChrome.css stylesheet
Tip: MiddleClick/MouseWheel Click on a Tab will close that Tab.
Tip: MiddleClick/MouseWheel Click on a History item will open the page in a new Tab
Tip: MiddleClick/MouseWheel Click on the Back and Forward buttons will open the last/next page in a new Tab
Tip: MiddleClick/MouseWheel Click on the Home button will open your homepage in a new Tab(s)
Tip: MiddleClick/MouseWheel Click on the Throbber (the ‘busy’ icon at the top-right) will open the Firefox homepage in a new Tab
Tip: For those without middle mouse buttons or mousewheels, ctrl-click will also open new tabs for links, bookmarks, bookmark folders, history items, and toolbar buttons
Tip: Ctrl+TAB you can navigate in the tabs to the right
Tip: Ctrl+Shift+Tab you can navigate in the tabs to the left
Tip: Many Laptops mimic the MiddleClick/MouseWheelClick function if you click both right/left pads at the same time.
Tip: Set mutliple Home pages : Tools—->Options—>General and seperate each page with the pipe | symbol
(eg http://www.errorforum.com/|http://www.gmail.com
You can enter more pages if you want.
Tip: Clear your Download history to make the download manager more responsive : Tools—->Options—>Privacy
Tip: Rearrange add/remove Icons on Toolbars: View—>ToolBars—>Customize….
Tip: Drag any link to the Download Manager Window to add & download the link
Tip: Pressing ctrl+enter will add http://www. before and .com after the text in the toolbar and load the resulting url. Similarly, shift+enter will add http://www. and .net, and ctrl+shift+enter will add http://www. and .org
Tip: You can work offline like in IE by clicking File>Work Offline. This means that you can browse your previously visited pages even when you’re offline.
Tip: If you wish to remove an item from your Address Bar Drop down menu, Highlight it WITHOUT CLICKING and use Shift+Delete
Tip: A bookmarks’s position Dragged & Dropped (ie. change position in a Folder or move from one folder to another or move to another position on the toolbar) by highlighting it & clicking on it (WITHOUT LETTING GO) and Dragging it to your desired position
Tip: A Folder can be move the same way as above tip but u MUST hold down the SHIFT key while Dragging
Tip: Former/current users of IE who are accustomed to copying items from “Temporary Internet Files” folder (FireFox calls it “Cache” ) can achieve the same results by Tools—>Page Info and then select the “Media” Tab, then Highlight the item u want to download and clicking “Save As…”
Tip: If u accidentally delete a bookmark and want to recover it, if it is not already open then, open the “Bookmarks Manager” (Bookmarks—>Manage Bookmarks) and either use Ctrl+Z or Edit—>Undo (in The Bookmarks Manager)
Tip: DoubleClicking a file entry in the Downloads Manager will open/launch the file (provided u haven’t moved it yet)
Tip: You can also directly download anything from a page by drag and dropping it onto the ‘download’ icon in your toolbar (provided you put it there in ‘right-click > customize’)
Tip: You can bookmark the current page by dragging the icon from the location bar to your Bookmarks folder. You can also drag it to the desktop to make an icon for that page
Tip: Of course, you can also do what the last tip said in the other direction: drag a text file, a link, a picture, etcetera… from your folders or your desktop to Firefox and it will open in Firefox
Tip: You can save all open tabs in a bookmark folder. Ctl-D, select the “bookmark all tabs in a folder” select or create a folder.
Tip: To stop animated gifs from moving, press the ESC key.
Tip: Instead of clicking the Back or Forward buttons, hold down the Shift key and turn the scroll wheel to back or forward
Tip: you can give “keywords” to your bookmarks by right-clicking the bookmark and then Properties. If you put a string in the keyword field now you can type that keyword in the address bar and it will go to that bookmark. For example, if I have a bookmark for the firefox website, I might give it the keyword “ff”. Now, when I type “ff” in the address bar, it goes to the firefox site. I find it is often faster than going through your bookmarks to find it
Tip: Ctrl and a number key will go to the tab indicated by the number. (e.g. Ctrl+3 will go to the third tab from the left)
Tip: CTRL+F5 refreshes the page without accessign the file cache
Firefox Mouse Tips
Middle Click
Note: Two-button mouse
For those without middle mouse buttons or mousewheels, ctrl-click will also open new tabs for links, bookmarks, bookmark folders, history items, and toolbar buttons.
Many Laptops mimic the MiddleClick/MouseWheelClick function if you click both right/left pads at the same time.
Clicking both mouse buttons at the same time also mimics the MiddleClick/MouseWheelClick function.
Tabs
MiddleClick/MouseWheel Click on a Tab will close that Tab.
Personal Toolbar
Middleclick/MouseWheelClick on a Bookmark on your Personal Toolbar will open it up in a New Tab
Folders
MiddleClick/MouseWheel Click on a folder will open all the bookmarks in the folder in a new Tab(s)
History
MiddleClick/MouseWheel Click on a History item will open the page in a new Tab.
Back and Forward buttons
MiddleClick/MouseWheel Click on the Back and Forward buttons will open the last/next page in a new Tab.
Home button
MiddleClick/MouseWheel Click on the Home button will open your homepage in a new Tab(s).
Links
MiddleClick/MouseWheel Click on a link will open that link in a new tab.
Throbber
MiddleClick/MouseWheel Click on the Throbber (the ‘busy’ icon at the top-right) will open the Firefox homepage in a new Tab.
Images
Middleclick/MouseWheelClick on “View Image” or “View Background Image” will open the image in a New Tab.
Double Click
Download Manager
DoubleClicking a file entry in the Downloads Manager will open/launch the file (provided you haven’t moved it yet)
Tab Bar
Double Clicking empty space on the Tab Bar will open a ‘New Tab’
Right Click
Customize Toolbar
You can adjust your toolbars to your liking. Right click on any toolbar, and select ‘Customize’. While this dialogue is up, you can move buttons around on your toolbars by click-and-drag to the new location. The window that pops up when you do this is a holding area for unused icons. You can drag any item from it onto your toolbars to have it made available, and you can drag any icon from your toolbars onto this box to hide that icon completely.
Tip: Some toolbar items, such as the Location bar, will expand to take up all available space.
Keyword Bookmark
Right clicking in a search box (such as the ’search mozillazine, powered by google’, on the left of this page) and selecting ‘add a keyword for this search’ lets you make an interactive keyword bookmark.
Here is how it works:
Give it a name, such as ‘Mozillazine search’
now, assign a keyword to it, such as ‘moz’
click ‘ok’
From now on, you can search mozillazine (or any other search box you used for this) from your address bar like this:
Enter ‘moz search topic’ in your address bar and click Go!
Drag’n Drop
Moving bookmarks and folders
You can change a bookmark’s position in a folder or move it from one folder to another or move it to another position on the toolbar by highlighting it & clicking on it (WITHOUT LETTING GO) and dragging it to your desired position.
A folder can be moved the same way as above tip but u MUST hold down the SHIFT key while dragging.
Icons
You can bookmark the current page by dragging the icon from the location bar to your Bookmarks folder. You can also drag it to the desktop to make an icon for that page.
Drag a text file, a link, a picture, etcetera… from your folders or your desktop to Firefox and it will open in Firefox!
Links
“Click-and-drag” a bookmark to the main content windown (which is the biggest on the firefox userinterface),so you can open it in a new tab !
Dragging a link onto a new tab will open the link in the new tab.
Downloading links
Drag any link to the Download Manager Window to add & download the link.
You can also directly download anything from a page by drag and dropping it onto the ‘download’ icon in your toolbar (provided you put it there in ‘right-click > customize’)
Mouse and Keyboard
Images
Holding down the Shift or Ctrl key when you RightClick to “View Image” or “View Background Image” will open the image in a New Tab or New Window.
Selecting text
If you hold down the CTRL key and left click on part of a web page, that section of the page will be highlighted. If you right click on the selection and choose ‘View selection source’, the source code for that part of the page will be displayed.
To quickly highlight text, especially long text fields. Left-click once in the window where you want the selection to start; and then shift-click in the spot where you want the selection to end (selection range). *this is a lot easier than click-selection-dragging, especially where there is a lot of text to highlight.
Quick Google search from Address Bar
1. Go to the “Bookmarks” drop-down menu and select “Manage Bookmarks…”
2. Select “New Bookmark…”
3. A Properties for New Bookmark will appear
4. Under Name, give it a name like, “google search”
5. Under location, put this address, “ttp://google.com/search?q=%s” but with out the quotation marks and put a “h” in front of the “ttp”
6. Under Keyword, put something very simple like the letter “g” (without quotes)
7. Hit OK then you are done.
once you have done this go to the address bar, type the letter “g” (without quotes), hit the spacebar and type any word you want to search for like “afterdawn”, hit enter and you have done a quick search. For example type, “g afterdawn”. press enter and a google search for afterdawn will turn up. Very Easy and Cool. Have Fun!
How to back up Bookmarks
1: from menu bar Bookmarks -> Manage Bookmarks…
it will open bookmarks manager window
2:
from bookmarks manager bar File -> Export…
and save the file
Read full story
 

My Blog List

Hello